不败君
2020-03-10 18:24:21
围观(5378)
本文并非使用 PHP 从 0 到 1 开发图像内容识别,而是接入百度 AI 的接口.当了一回标题党...
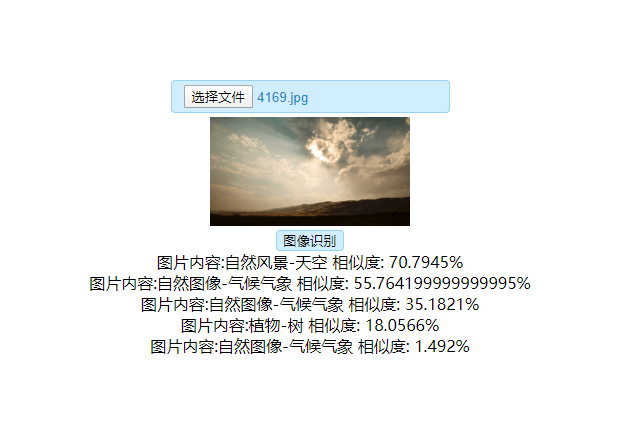
实现的效果

接口
获取百度 AI 的 access_token:
https://ai.baidu.com/ai-doc/REFERENCE/Ck3dwjhhu
通用物体和场景识别高级版:
https://cloud.baidu.com/doc/IMAGERECOGNITION/s/Xk3bcxe21
官方的介绍:https://ai.baidu.com/tech/imagerecognition/general
除了 "通用物体和场景识别高级版" 接口外, 还有其他的接口, 感觉也挺有意思的, 比如:菜品 / 车型 / 动物 / 植物 / 果蔬 / 货币 识别的接口, 但本文仅以 "通用物体和场景识别高级版" 为例子开发, 当然这些接口是有调用次数限制的, 如果是商业或者高并发的业务需求 是需要购买套餐的. 像博主这样随便玩玩的话就是免费的.
代码
直接上代码, 先是前端:
<!DOCTYPE html>
<html>
<head>
    <title></title>
    <meta charset="utf-8">
    <style type="text/css">
        #img_area img{
            max-width: 200px;
        }
        .box{
            width: 500px;
            margin-left: auto;
            margin-right: auto;
            margin-top: 10%;
            text-align: center;
        }
        #input{
            position: relative;
            display: inline-block;
            background: #D0EEFF;
            border: 1px solid #99D3F5;
            border-radius: 4px;
            padding: 4px 12px;
            overflow: hidden;
            color: #1E88C7;
            text-decoration: none;
            text-indent: 0;
            line-height: 20px;
        }
        #start{
            display: none;
            margin-left: auto;
            margin-right: auto;
            background: #D0EEFF;
            border: 1px solid #99D3F5;
            border-radius: 4px;
        }
    </style>
    <script type="text/javascript" src="https://cdnjs.cloudflare.com/ajax/libs/jquery/3.4.1/jquery.min.js"></script>
</head>
<body>
<script>
    window.onload = function(){
        var input = document.getElementById("input");
        var result= document.getElementById("result");
        var img_area = document.getElementById("img_area");
        if ( typeof(FileReader) === 'undefined' ){
            alert('抱歉,你的浏览器不支持 FileReader,请使用现代浏览器操作!');
            input.setAttribute('disabled', 'disabled');
        } else {
            input.addEventListener('change', read_file, false);
        }
    }

    function read_file(){
        var file = this.files[0];
        if(!/image/w+/.test(file.type)){
            alert("请选择正确的图片");
            return false;
        }
        var reader = new FileReader();
        reader.readAsDataURL(file);
        reader.onload = function(e){
            result.value = this.result;
            img_area.innerHTML = '<img src="' + this.result + '" />';
            document.getElementById('start').style.display = 'block';
        }
    }

    function post() {
        if (!this.result.value) {
            alert('请选择图片后重试');
            return;
        }
        $.ajax({
            url: 'ai.php',
            method: 'POST',
            data: {
                img_base64: this.result.value,
            },
            success: function(res){
                if (!res.code) {
                    if (!res.data) {
                        alert('该图片无法识别');
                        return;
                    }
                    var show = document.getElementById('show');
                    var view_data = '';
                    for (var i = 0; i < res.data.length; i++) {
                        view_data += '<p>图片内容:' + res.data[i].root + ' 相似度: ' + res.data[i].score * 100 + '%</p>';
                    }
                    show.innerHTML = view_data;
                } else {
                    alert(res.msg);
                }
            }
        });
    }
</script>
<div class="box">
    <input type="file" id="input">
    <input type="hidden" id="result">
    <div id="img_area"></div>
    <button onclick="post()" id="start">图像识别</button>
    <div id="show"></div>
</div>
</body>
</html>
前端代码主要实现选择图片并将图片进行 BASE64 格式,然后显示图片在页面上,点击识别时使用 AJAX 提交图片的 BASE64 格式到后端的 ai.php 文件,将后端会返回的 JSON 字串解析并显示在页面.
接下来就是 ai.php 文件的代码了:
<?php

header('Content-Type: application/json');

function request_post($url = '', $param = '')
{
    if (empty($url) || empty($param)) {
        return false;
    }

    $postUrl = $url;
    $curlPost = $param;
    // 初始化curl
    $curl = curl_init();
    curl_setopt($curl, CURLOPT_URL, $postUrl);
    curl_setopt($curl, CURLOPT_HEADER, 0);
    // 要求结果为字符串且输出到屏幕上
    curl_setopt($curl, CURLOPT_RETURNTRANSFER, 1);
    curl_setopt($curl, CURLOPT_SSL_VERIFYPEER, false);
    // post提交方式
    curl_setopt($curl, CURLOPT_POST, 1);
    curl_setopt($curl, CURLOPT_POSTFIELDS, $curlPost);
    // 运行curl
    $data = curl_exec($curl);
    curl_close($curl);

    return $data;
}

function response($msg = '', $code = 0)
{
    exit(json_encode([
        'code' => $code,
        'msg' => $msg
    ]));
}

function get_access_token($post_data, $access_token_file)
{
    // 请求接口获取 access_token
    $url = 'https://aip.baidubce.com/oauth/2.0/token';
    $post_data['grant_type'] = 'client_credentials';

    $request_params = "";
    foreach ( $post_data as $key => $value ) {
        $request_params .= "{$key}=" . urlencode($value). "&";
    }
    $post_data = substr($request_params,0,-1);

    $access_token_res = json_decode(request_post($url, $post_data), true);

    if (!isset($access_token_res['access_token'])) {
        response($access_token_res['error_description'], 401);
    }

    // 将 access_token 保存
    $access_token_data = [
        'access_token' => $access_token_res['access_token'],
        'expires_in' => $access_token_res['expires_in'],
        'time' => time(),
    ];
    $file = fopen($access_token_file, 'w');
    fwrite($file, json_encode($access_token_data));
    fclose($file);
    return $access_token_res['access_token'];
}

if (!isset($_POST['img_base64']) || empty($_POST['img_base64'])) {
    response('请选择图片后重试', 403);
}

$image = mb_substr($_POST['img_base64'], mb_strpos($_POST['img_base64'], 'base64,') + 7);

// 百度 AI 的应用信息
$post_data['client_id'] = '你的 Api Key';
$post_data['client_secret'] = '你的 Secret Key';

// 读取已经保存的 access_token
$access_token_file = 'access_token.json';
if (!file_exists($access_token_file)) {
    $access_token = get_access_token($post_data, $access_token_file);
}

// 判断access_token 是否到期 及 是否正确
$access_token_data = json_decode(file_get_contents($access_token_file), true);
if (!isset($access_token_data['access_token']) || time() >= $access_token_data['time'] + $access_token_data['expires_in']) {
    $access_token = get_access_token($post_data, $access_token_file);
} else {
    $access_token = $access_token_data['access_token'];
}

// 请求 通用物体和场景识别高级版 接口
$url = 'https://aip.baidubce.com/rest/2.0/image-classify/v2/advanced_general?access_token=' . $access_token;
$bodys = array(
    'image' => $image
);
$res = json_decode(request_post($url, $bodys), true);

echo json_encode([
    'code' => 0,
    'data' => $res['result']
]);
ai.php 文件有些代码其实是直接复制了接口文档给的 DEMO,因为是短时间内将代码敲完的,所以有些地方是可以进行优化的.
需要注意的是,上面的 ai.php 文件代码中,有这样两句:
$post_data['client_id'] = '你的 Api Key';
$post_data['client_secret'] = '你的 Secret Key';
需要将等于号后面引号内的值改为在百度 AI 创建应用生成的.
直接到这个页面 login.bce.baidu.com 就可以登录百度账号去创建应用了,整个过程不用几分钟.
本文地址 : bubaijun.com/page.php?id=168
版权声明 : 未经允许禁止转载!
上一篇文章: 简单使用Laravel 7的Airlock
下一篇文章: 使用HTML和JS开发生命计算器